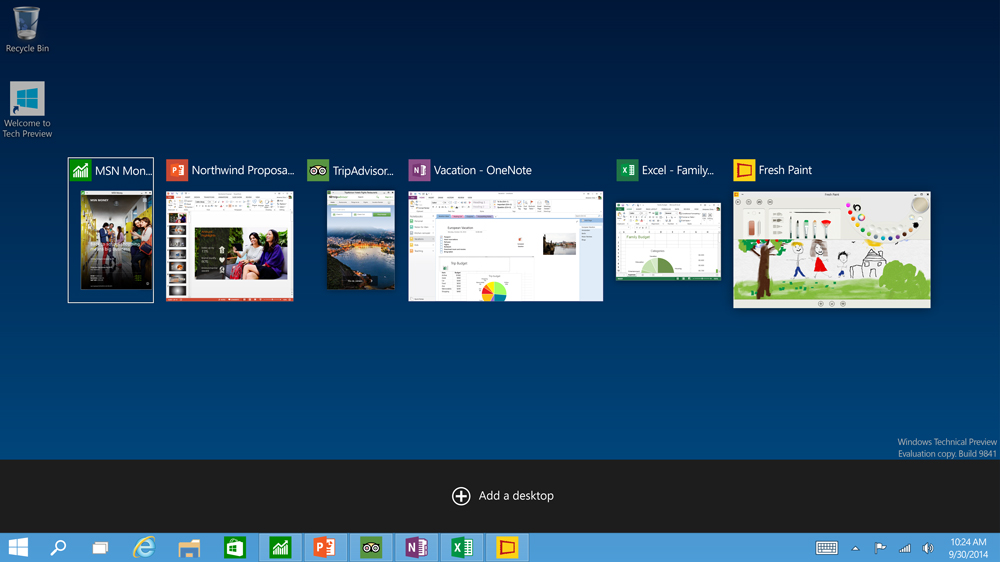
Saturday, October 4, 2014

Grab Windows 10 Technical Preview Now ( Direct Download Link + Torrent Link )

A preview for PC experts


Windows Technical Preview is here today, but it’s a long way from done. We’re going to make it faster, better, more fun at parties...you get the idea. Join the Windows Insider Program to make sure you get all the new features that are on the way. If you’re okay with a moving target and don’t want to miss out on the latest stuff, keep reading. Technical Preview could be just your thing.

Download and install the preview only if you

  • Want to try out software that’s still in development and like sharing your opinion about it.
  • Don’t mind lots of updates or a UI design that might change significantly over time.
  • Really know your way around a PC and feel comfortable troubleshooting problems, backing up data, formatting a hard drive, installing an operating system from scratch, or restoring your old one if necessary.
  • Know what an ISO file is and how to use it.
  • Aren't installing it on your everyday computer.
We're not kidding about the expert thing. So if you think BIOS is a new plant-based fuel, Tech Preview may not be right for you.

Things to keep in mind

Unexpected PC crashes could damage or even delete your files, so you should back up everything. Some printers and other hardware might not work, and some software might not install or work correctly, including anti-virus or security programs. You might also have trouble connecting to home or corporate networks.
Also, if your PC runs into problems, Microsoft will likely examine your system files. If the privacy of your system files is a concern, consider using a different PC. For more info, read our privacy statement.

What does it work with?

Technical Preview should work with the same devices and programs that work with Windows 8.1, but you might need to update or reinstall some of them.
Drivers for basic functions like storage, networking, input, and display come with Windows. These drivers allow you to complete the Windows installation and connect to the Internet. You might be able to get more drivers from Windows Update.
For compatibility info, see the Windows 8.1 Compatibility Center.

Direct Download Links : (Official Link)

English (USA)   -     32 Bit           64 Bit                     
English (United Kingdom)    -    32 Bit           64 Bit    
 Chinese (Simplified)     -   32 Bit          64 Bit              
      Portuguese (Brazil)      -      32 Bit      64 Bit                   


How To Create Wi-Fi Hotspot With Laptop/Wi-Fi Device On Windows 7/8/8.1

There are many ways to create wi-fi hotspot with your Laptop/Desktop With Wireless Device , I'll show you the best ways to do this and you have to choose the best one for you , let's Go >>>


Method 1 : Using Connectify Hotspot App

Step 1 : Download Connectify Hotspot Free Version from here , You can purchase the pro app for 7.50$ for 1 year or 12$ for lifetime .....


Step 2 : Install Connectify app By simply following instructions of the installer .


Step 3 : Reboot if asked , Allow Connectify to access to internet connection By allowing in windows firewall prompt ...


Step 4 : After Rebooting PC connectify interface will come up like this and enter a name for your hotspot then enter a password which has to be 8 characters or more . Select Device to share internet from and select device to share over , then click Start Hotspot ....


Now, you can start using wifi from your Smart-Phone/Laptop with in the range of your Wi-Fi device .


Method 2 : Using Virtual Wi-Fi Router 

Step 1 : Download latest version of Virtual Wi-Fi Router From Here . it's super lightweight 1mb +- sized . and install following on UI instructions then Run The Program as Administrator .


Step 2 : Give the hotspot a name , password , select share net from and hit start .


Now, you can connect your devices right away


Method 3 : Using Command & Windows 

This Method is for those who don't feel comfortable with 3rd party software and want to create wi-fi hotspot with default windows feature , This is the best way but since there's no user interface and involves a bit work some people may not like it , how ever let's get started >>>

Step 1 : Open Command Prompt (CMD) as an Administrator (Press Windows Key + X + A) or


Step 2 : Type following command to ensure your pc supports Hosted network feature 

netsh wlan show drivers


If Hosted network support = yes then proceed to to next step, if not try installoing/updating your wifi device driver .

Step 3 : Now,To config Our Ad-Hoc network type following code in the command prompt and press enter

               netsh wlan set hostednetwork mode=allow ssid=yourdesirednetworkname key=yourpassword 

See the image to understand correctly.


Step 4 : Now,Start the Hosted network by typing following command  

netsh wlan start hostednetwork


Step 5 : Now , in Winows 8 or 8.1 Goto "Control Panel\Network and Internet\Network and Sharing Center" and click on "Change Adapter Settings"  in Windows 7 Goto "Control Panel > Network and Sharing Center" and click on "Change adapter settings"


Step 5 : Right Click On Wi-Fi then click on Properties 


Step 6 : Finally, Head to Sharing tab , Check on "Allow other network users to connect through this computer's Internet connection" box , Select The network you are getting internet from and Finally hit or


That's It You are done , you're Wi-Fi hotspot is running now......


There are many more software for windows to create hotspot like MyPublicHotspot , mhotspotwifihotspotcreator , maryfi etc feel free to use them and plz share your experience here , , , , ,


Friday, August 15, 2014

Windows 8.1 Update 1 offline update download links for Windows 8.1 User's

Microsoft officially released an update for windows 8.1 with some new features and security update,performance improvement , you can always update your windows with windows updater but i'd recommend to update manually with offline update's , cause the update size is over 800mb and during update you can't restart your device and after downloading offline update once you can use it over over so i prefer offline update


Download the version for your windows machine , please note that you have yo have windows 8.1 to install this updates .

64-bit
32-bit
ARM (mobile)

These links are direct link to Microsoft's site , before downloading what version of windows (32bit/64bit) you are using , after downloading run the files one by one and if one update is not installing properly then install rest of the updates first and then install the one with problem it will surely install without any problem , after installation restart your computer/phone it should take 20-30 minutes to install update so be patient .

There you have a fully updated Microsoft windows machine, Enjoy , To learn how to make windows 8.X.X faster take a quick look at this post  , To remove Folder/Libraries from explorer click Here  Browse this blog and feel free to post anything you wan't people to know about by requesting for authorship .  

Get Hidden Smart Slide To Shut-Down button Short-Cut for windows 8 and 8.1 easily

Finding the shut-down key on windows 8 and windows 8.1 can be pretty uneasy stuff to so,e people and if not , then if i'm to tell you there's a exciting new way of shutting down your pc which is far smarter and no external slowmo software's needed to get this in fact this cool option is hidden in Windows system , would you like Slide To Shut Down ? 


How To Get This : 

Option 1 : Press WindowsKey+R To open Run and Type slidetoshutdown.exe then press ok to run shut-down slider


Option 2 : Since option1 requires to open Run menu each time to get the Slide to shut down menu ,we are going to use another option, we'll create a shortcut to the original "slidetoshutdown.exe"

Step 1 : Right Click on any empty space on desktop and hover on New and then select ShortCut


Step 2 : Now, in the create shortcut window type slidetoshutdown.exe and click next , now name your shortcut anything you want , any you are done you have a shortcut to slide to shutdown.


Now, you can pin it to the start or the Taskbar or keep the shortcut anywhere you feel comfortable with.You can always Change the icon to make it look better like i did :D


Some Windows ShortCuts to make your work few times faster


Ctrl+C (Copy)
Ctrl+X (Cut)
Ctrl+V (Paste)
Ctrl+Z (Undo)
Ctrl+Y (Redo)
Ctrl+A (Select all)
Alt+Enter or Alt+ Double Click on Any Icon (View the properties of selected item or any folder)
Alt+Tab (Switch between many open items)
F2 key (Rename selected item)
Ctrl+Shift+Esc (Open Task Manager)
Ctrl+Tab (Move forward the tabs)→This Shortcut helps you in browsers, you can move tabs forward if you open many tabs in browsers.
Ctrl+Shift+Tab (Move backward the tabs)→This is reverse process of Ctrl+Tab
Ctrl+F (Start the Find utility)
Ctrl+Shift with any arrow key (Highlight a text or item)
Windows Logo+D (Display the desktop)
Windows Logo+M (Minimize all the windows)
Windows Logo+E (Open My Computer)
Windows Logo+ L (Lock the computer)
Windows Logo+R (Open the Run dialog box)
Windows Logo+U (Open Utility Manager)

How To Get MyComputer/This Pc icon on Desktok in any version of windows

By default , after installation in a windows machine the windows explorer icon aka My Computer icon is not shown , to some people this icon is very important and still don't know how to get it ! Let's get it >>


1. Right Click on the desktop's empty space anywhere and click on Preferences


2. On the upper left in preferences click on "Change Desktop Icons" , A new window named "Desktop Icon Settings" will open , In this window in "Desktop Icon's" tab click on Computer and then click apply and then OK.


There you go , you have MyComputer / This User shortcut Icon to your desktop now , to get super smart Easy pull down to shutdown shortcut click here .

How to remove Libraries/Folders from This PC or Windows Explorer and customize drive's viewing style in windows 8 and windows 8.1

After Installing windows 8 , the first annoying thing i noticed is the libraries are shown right on the windows explorer on the HDD icons and the CD/DVD Rom and other media devices were in same tab,which made me pretty uncomfortable , i spent a huge time searching on the web for a way to remove them but at that there were no info about this problem , after too many try's i finally found a way to remove the libraries from the Explorer , Be-four it was used to look like this

How to remove Libraries from This PC or Windows Explorer and customize drive's viewing style in windows 8 and windows 8.1
UserCentral

Let's Remove these :

Step 1 : Press WindowsKey+R to open Run and Type regedit in run to open registry editor


Step 2 : Navigate to HKEY_LOCAL_MACHINE\SOFTWARE\Microsoft\Windows\Current Version\explorer\MyComputer\NameSpace   and inside NameSpace delete all the folders without "DelegateFolders" folder , after this step NameSpace Should look like this :


Now , close Registry Editor and enter This PC , Magic !!! the Folder's are gone but still the CD/DVDRom, Removal Device and HDD Drive's are shown together , that's quite annoying right?


Let's Make'em Look Good :

1 . Goto ThisPC / Explorar right click on any empty place , hover over "Sort By" and click on More


2 . In Choose details Click on File System and then press ok


3 . Right click on any empty place on Explorer again , hover over "Sort By" and click on File System option Like this


That's The Much You Can Do about Explorar to beautify , Rename This pc to anything you want simply by right clicking on The ThisPC icon and Goto Rename Option , Can't Get ThisPC/My Computer Icon ? Get it easily From Here Now.......